PhotobucketHomeAbout Me

Thursday, July 29, 2010

Back again after a long week...

I've had a few job interviews and some impatient waiting in between for a call back and finally got one today! So, YAY! Back in the workforce. I starting thinking about how I'm going to miss having Luke all to myself everyday while Josh is at work, but this will be great for us and will provide us with some more money to travel while in Europe. I'm SO ready!

Thought I'd share this picture of Luke we took a few days ago, probably my favorite one to date.

And, I pulled a few papers from my stash that have been in there a while (Jenni Bowlin and Lily Bee) and grabbed everything I could that matched. I put this one together and couldn't be happier.I think I've decided that I'm a "grid" scrapper. I like things to be grouped together and I feel like I'm the most comfortable that way.
I've been thinking about scrapbooking lately. Been down in the dumps about some design team calls I didn't make, publications I didn't get chosen for. But then I dusted myself off and thought, WAIT. I don't do this to showcase product. I don't do this to impress anyone. I'm preserving my photos and telling my stories. I just don't get the single 2x2 photo on paper with a messy mist spray in the background. It's just not me. I want people to SEE my pictures and cherish them, not squint their eyes to try to even tell who was even in the picture... haha.
Okay, rant over; sorry about that.
Anyway, I'm looking forward to starting my job as an accountant with my own OFFICE! Now, I'm on the hunt for some cute office supplies and things for my desk! YAY!

Saturday, July 24, 2010

Dinner at Uptown, and my new favorite layout!

So it figures, I forgot my camera when we went to dinner last night. But Fatos was thinking and she brought hers so I borrowed this picture:

The food was awesome, the weather was perfect, and the view was gorgeous. I wish I had a picture of my dinner- I had spicey kebap wrapped in a sort of bread with roasted tomatoes. MMmmm. It was amazing.
And just a little bit ago, I decided I needed to use up some of my Studio Calico Documentary papers. (I always buy two of everything SC makes and then I selfishly hoard it, so, since Elementary is coming out soon I need to use up what I have to justify my next purchase!) I tuned out the babe, my husband playing video games, the dishes in the sink and I put this together.
And, I LOVE it. It's my favorite one to date. I love it so much, I took a picture of it on my kitchen floor at 11PM instead of waiting for the better lighting in the morning. haha
Anyway, if you don't have this line- get it. It's not just for travel themed layouts either- the geometric prints alone are awesome, and the colors... oui. It's yummy.

SUPPLIES:
Cardstock: Bazzill
Patterned Paper: Studio Calico
Stickers: Studio Calico
Ink: Stazon, Stampin Up!
Pen: Uniball Signo, Zig

Thursday, July 22, 2010

Travel Page

Hey there! I missed posting this to my blog for some reason so I'm going to share it today.

Over 2 days and 24 hours and this is the ONLY picture I took throughout the whole thing. And ya know what? I made my husband lug the DSLR in his carry-on because I just HAD to get pictures of Luke on the airplane. Good thing he ended up being as exhausted as I was and didn't notice I hadn't taken it out the whole time. =)

Tomorrow night we're going to dinner with our Turkish friends out by the lake so I'll be sure to take some pictures and share them tomorrow. (I won't make the husband carry the camera this time, though.) The region we are in is so beautiful, it's just too bad it's so hot outside all day or I'd be taking pictures of everything!

I'll leave you with my favorite pictures I've taken here so far. Aren't the colors amazing?

Wednesday, July 21, 2010

New techniques!

I'm going to share my first ever tutorial with you!
In this layout, I did a couple new things that I had never tried before.

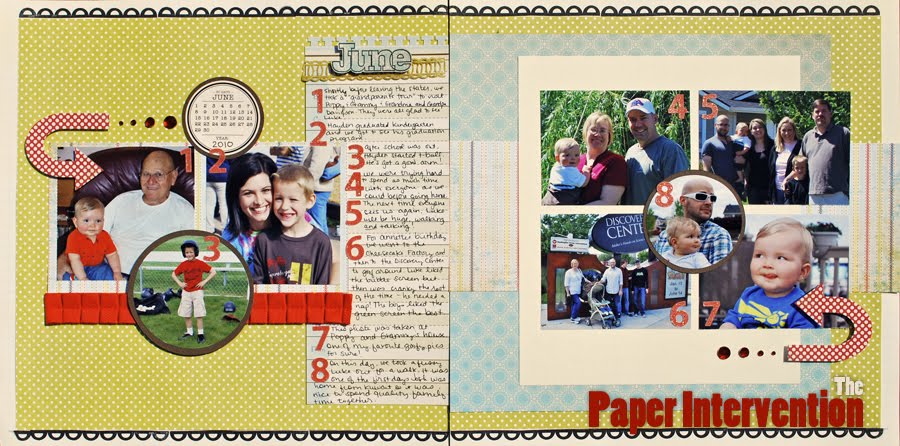
First, the stamped title for my page is partially cut out of the cardstock so the photo can be tucked in behind it.
Also, I used my slice to cut out the heart shape from strips of paper and then used another cut out for a mist mask.
First, for the text, cut your cardstock down to the size you want.

Line your photo up, and once you have it in its position, draw a line underneath it.
Here's one of my favorite tips ever:
Use your paper trimmer to help you draw straight lines! It's great for journaling since you can space your lines evenly and it's super fast!
Next, line your stamps up on top of your photo, making sure that the bottom of the stamp is on the cardstock base and the top overlaps your photo.

Next, draw another straight line underneath your stamps.

Now, you can remove the photo. Line your stamps back up and trace around them- only where they extend above your top line (or where they are going to overlap the photo). The SC stamps work really well for this because they are cut nice and close to the actual image. If you are using a stamp that is not cut this way, you can eyeball it and get pretty close. It doesn't have to be perfect.You should have something like this now: (please excuse it being so dark...)
Now, use your craft knife to cut around the lines you have drawn. Just keep in mind for the curved lines to always keep your hand moving and go slow! If you have a nice and sharp knife, this part should be pretty easy.

Now that you have it all cut out, stamp your letters, lining them up with your bottom line. (I slipped a bit trying to take a picture and stamp at the same time haha)

Now, erase your pencil lines and slip your picture in behind your letters and voila!

Now, for the misted hearts. I used strips as my background for my page. Once I knew about how far apart they were going to be spread out, I laid them on my Slice glass mat the same distance apart.
Here's another awesome tip for Slice users:
instead of the messy adhesive Making Memories sells (and that you can sometimes put too much on and then end up with your paper super glued to your mat), I use a restickable glue stick! The application is easier, it's less messy, and I've never had a problem with it being "too sticky".


Anyway, I cut out a 2" heart a little sideways from my background strips. Then, I cut out a 1.5" heart from some scrap paper.


Then, I lined the heart from the scrap paper up with the heart on my strips and misted over the top of it.
I'm really not the greatest mister and I didn't like how messy mine came out looking so I just added a few faux stitching lines with my white pen.


Here's what my finished page looks like again:


And there you have it! I hope you learned something new and if you decide to try either of these techniques out, I'd love to see what you came up with!
Thanks for stopping by!

Tuesday, July 20, 2010

June Project 12 and Cards

Hello again! I've been busy making birthday cards (have a few coming up in August!) so I'll share some with you!This is the first card I did. I used Papertrey Ink's Color Couture paper download for the background on this. I started out only using Orange Zest and Hibiscus but I threw the green in at the last minute and I love these colors paired together.For the next card, I ran back and grabbed these papers randomly and put this one together. I wanted to try the sentiment on a circle and rest came later. I don't like the bunched ribbon- it looks thrown in there. Originally, more of the ribbon showed through so it wasn't so bad but once I started sticking things down I guess I moved over too much. Still a cute color combo though!
The last one is for my sister. I had a pre-cut piece of Hibiscus and thought pink and black was perfect for Whitney. I used a flower center from Beautiful Blooms II and embossed it with black. Papertrey Ink came out with a new notebook paper die and I haven't received mine yet, so I winged it and made my own. I just border punched the top with my EK punch and then, with my Martha scoring board, I scored a line across the top. Super easy!
I made my June layout for Project 12, and of course, the lighting is terrible so the colors are all wonky. Oh well, you get the jist! I used Studio Calico's Continental kit for this one.
I have a layout to share tomorrow. I started it last night and have been trying a few new techniques that I'll show you. I'm using mist on this guy, and now I know why I don't use mist more- I've almost ruined my background paper and will have to try something to cover up my uh-ohs. Frustrating. =)

Supplies:
Birthday Wishes
Cardstock: Papertrey Ink - Stamper's Select, Hibiscus Burst
Patterned Paper: PTI- Color Couture
Stamps: PTI- Beautiful Blooms II & Up Up & Away
Ribbon: PTI- Simply Chartreuse
Button: PTI- Simply Chartreuse
Other: DMC Floss

Paper Lantern Birthday
Cardstock: PTI
Patterned Paper: My Mind's Eye (Abbey Road)
Stamps: PTI- Giga Guide Lines, Vintage Labels, Circles
Chipboard: My Mind's Eye
Ribbon: PTI- Hibiscus
Punch: EK
Other: DMC Floss

Birthday 21
Cardstock: PTI
Stamps: PTI- Beautiful Blooms I & II, Giga Guide Lines
Ribbon: PTI
Chipboard Alphas: American Crafts
Other: Prima Pearls

Tuesday, July 13, 2010

4th of July and Kindergarten Graduation

I have a couple of layouts I've done in the past two days to share really quick- then I must get back to dinner on the stove!
For my 4th of July layout, I got the idea for the trails on the fireworks from the July issue of Creating Keepsakes. I had the doilies sitting out and thought, wow, there's my fireworks! I just jazzed them up with some mists and some bling.The sketch is from July's Pagemaps. I love using Becky Fleck's sketches for photo sizes, it really takes a lot of the work out of the process.

Since I already had these papers out, I made a quick 6x6 page for a mini album. This might be my favorite picture of Luke ever.


Then, as I was going through my June pictures, I had all of these from my brother's graduation. figured I'd better get a page done before he graduates high school. =P I got the idea of the tearing and layering the background papers from a 2Peas Garden Girl.

Thanks for looking, now I better make sure dinner isn't burning!
Oh and before I forget, I tried another doily the other night and it didn't quite turn out the way I wanted. I looks pretty forced to me. Oh well, I'll try another one soon!

Saturday, July 10, 2010

Embellished Paper Doilys

Somehow, I managed to stumble upon Christine Middlecamp's Embellished Paper Doily tutorial and WOW, I was amazed. I finally had some time last night and decided I'd try my hand at them. I followed her examples very closely, substituting what I didn't have with things in my stash. I'm in love with these and can't wait to put them on cards.

I love the color scheme on this one. It's an awesome "summery" feeling doily.

This second one is definitely my favorite. Too bad I only have one of those chipboard flowers and that Vintage Findings button or I'd make 20 of them.


I plan on doing a few more of these tonight, but I'm going to see what I can come up with on my own. I love that I can use things from my stash that I didn't really know what to do with before!

Thanks for looking!

Project 12 - May

Well, I've FINALLY managed to scrap May. With all that's been going on in the last two months I didn't think I'd ever get to it. I still haven't even touched June- and that's because GASP! I'm out of kraft paper. And I can't just run to the LSS anymore. Hard times, I know.

Here's the sketch:


This is what I came up with. I wasn't sure exactly how to incorporate the circle in the background so i just added some handstitched circles here and there. I LOVE these colors together. Everything is from Studio Calico's kit "Granny's Cupboard".


Btw, I'm getting super lazy lately. I'm liking totally bypassing the supply lists! =)

Wednesday, July 7, 2010

Printer Tray

I bought this 7 Gypsies printer tray from a local scrapbook store while in Boise. They've been selling them on Studio Calico and I've seen a lot of them turn out really good but wasn't exactly sure what to use mine for. Then, after settling in back home in Turkey I broke this guy out and my Studio Calico kit for the month and went to town. I really loved this impromptu photo shoot we did at the Depot and these are photos I'm really glad to have. I love that I can look at them everyday hanging on my wall now!

Newness

I'm going to forgo the supply lists here and just show you all the things I haven't posted yet!


I'm not very happy with how this one came out. Seems a little plain and just tossed together. But it's a cute picture, anyway.

Went a little outside my comfort zone on this one. I'm not really big on flowers and butterflies but wanted to use them on this cute yellow paper.


This is one of my favorites. I love the blue and red together! I believe I used a Studio Calico sketch for the layout.

I love the honeycomb paper from Studio Calico- it's one of my favorites from them.
Anyway, thanks for looking!